
Last week I talked about tightening up purl stitches and posted a lovely Youtube video by Cat Bordhi on how to do that.
This week, I'm going to talk about something near and dear to my heart and that is How many turning chains to make when you are using double crochet and how the Golden Loop affects your gauge.
The answer is quite simple. It depends on how tall your double crochet stitch is.
 |
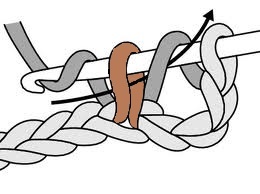
| Tall Golden Loop dc |
If the first loop you pull through the stitch is very long, then you will have a tall double crochet stitch which will mean you will need to chain 3 to turn.
 |
| Short Golden Loop dc |
But if your first loop is very short and tight, that will make a short double crochet stitch which will only require a chain 2 to turn. Doing this will keep your edges nice and even with no bumps from a too long turning chain.
Most patterns say to chain 3 to turn, that seems to be the standard. But just because a pattern says to chain 3, it doesn't mean you HAVE to chain 3 to turn! There is no written rule that says you have to follow a pattern to the letter or in this case the number. Check how you make your double crochet and it will tell you how many you need to chain to turn.
The other thing that this Golden Loop affects is your gauge!
When you make a gauge swatch and you find that you are not meeting row gauge, chances are your first loop is either too tight or too loose. If your row gauge is too short, when you pull your first loop through for each stitch, pull up a bit more on it and it will make your stitch higher. If your row gauge is too high, don't pull up quite as much on your golden loop and you should hit row gauge.
While researching this post, I came across a Crochetville forum post in which Jean Leinhauser described her Golden Loop method for the double crochet stitch:
"YO, insert hook in specified stitch and draw up a loop -- NOW STOP! This is the Golden Loop, and it determines the ultimate height of your stitch. If you need a taller stitch, draw this loop up higher. If your stitch is too tall, don't draw this loop up so high.Now just finish the dc as usual. You may need to practice a few rows with the new height to get it to become automatic. It is this one loop, not the size of the hook, that determines row gauge."
What I'd been doing for a long time was simply doing a chain 2 instead of the requested chain 3. Since I found this gem, I have used it to adjust the row gauge and it works like a charm!
I've also tried other ways of taking in the turning chain when it had a bad habit of sticking out. One of those ways was to insert the hook in the 2nd chain from the hook, draw a loop through (this replaced the usual yarn over) and then insert my hook into the next stitch, yo, pull yarn through the stitch and the first loop on my hook, yo again and draw through both loops the same as a regular dc. This would make my chain 3 stick to the next stitch like glue. In some instances, this is a really good fix for example blankets, dishcloths, anything that has an edge that will not be finished.
I hope this helps solve some of the row gauge issues that many crocheters have. Good luck and let me know how it works out for you.
Thanks for this turning tip and the explanation of the golden loop! :)
ReplyDelete______
Lee Ann H
Crochet...Gotta Love It! Blog
Crochet...Gotta Love It! Website (crochet names and rosary patterns)
You are most welcome.
DeleteLearning about these made a huge difference in my crochet projects and designs.
Glad I could help!
Angel