Showing posts with label Angel's Crochet knit time. Show all posts

Tuesday, July 10, 2012

Angel's Crochet & Knit Time - Benefits of Crochet & Knitting

Print Friendly and PDF
Instead of talking about a stitch, or a technique, today I thought I'd talk about the benefits of crochet and knitting. Yes, I know, many have written about this in the past but I think I'll come at this from a slightly different view point... that of the person witnessing and living the changes on others and herself.

Last Friday was my knit/crochet group that meets at the local library. I started this group at the beginning of May of this year and each week I have new faces joining those who started back in May. One of those ladies who started back in May came to me with a printout of an article that her therapist gave her last time she visited her. The article comes from Stitchlinks, a website dedicated to collecting data of all types about the relationship between knitting and pain management. Her therapist told her that she has seen a marked change in her in the past two months and she thinks that it has a lot to do with her joining my group.

Many of the ladies who attend my group have health issues ranging from mild to severe. Many of these health issues involve pain which needs to be managed, either medically or through some other means if drugs are not their choice. I myself suffer from fibromyalgia and pain is something I live with daily. 

The lady who gave me the article that sparked this blog post suffers from major pain due to an accident. The pain is severe enough that it affects her mental state, her concentration, and the accident itself has affected the muscles of her hands and arms. When she first began attending the group, she was quiet, apologetic for her lack of dexterity, and confidence was completely absent. With gentle words and guiding hands, I taught her how to do a long-tail cast on, and how to knit. Her first project was a short scarf for herself for this winter. It took 6 weeks to complete, but she could claim it as her own and the pride in her voice and on her face when she showed it off to the group was wonderful to see. Two months have gone by since that first day in May and she is now moving forward, picking her own projects, assessing her own skill level and she's finally realized what a difference learning to knit has made in her life.

She has found confidence, determination, a reason to go home every day, a reason to get up every morning. She finds that the level of pain goes down dramatically while she is knitting as well as for several hours later. She also finds that she is not nervous like she used to be, that she can relax much more easily and when things get tough at work, just thinking about knitting when she gets home keeps her going through the rough spots. As she pointed out one of the quotes on the article she handed me "I feel valid, not in-valid. Able not dis-abled." she told me quite confidently that is how she feels now and then she thanked me. I told her the person to thank was herself for coming to the group, for taking that very first step. 

I've found over time that knitting and crocheting do the same things for me. The time I spend knitting/crocheting, my mind is free to sort through other things. As I concentrate on a stitch pattern, other parts of my brain are working on problems that I am trying to resolve. I find that I am calmer, happier, that the pain recedes far enough away to make it bearable most of the time. The pattern distracts my mind from the pain. Some days I have to work at it a bit harder, but most of the time, it works quite well and gets better with practice. These days I hardly touch my pain killers. I keep them for the days that nothing and I mean nothing else makes it recede. But those days are far and few apart thanks to knitting and crocheting.

As for the Stitchlinks site, I've gone through it and it is quite good. There is a lot of information about controlling pain through crafting, there is an active Forum that you can participate in and information on how to start your own therapeutic knitting group in your neighbourhood. Having a group of women and men who knit and crochet and talk together, sharing their lives, experiences, etc every week is an experience I never thought would be so beneficial to others but what surprised me even more, is how beneficial it has been for me as well. An experience well worth sharing with everyone out there!


Tuesday, July 3, 2012

Angel's Crochet & Knit Time - Foundation Crochet Stitches

Print Friendly and PDF

At my knit and crochet group that meets every friday afternoon, I have begun teaching crocheters this method of beginning a project, especially those projects like blankets, sweaters, anything that requires a stretchy edge; how to do this very easy foundation row.
The foundation crochet method was developed by or made popular by Bill Elmore which I'm not sure.  His foundation method is applied to single, half double, double,  triple crochet, etc ... and the great thing about it is that you are making the initial chain row and the single (or half double, double or triple) crochet row at the same time.
The top 4 reasons foundation crochet is absolutely awesome!
  1. No more tight, constricting chain row buckling your first row of single crochet and making your blanket, sweater, etc... assume the shape of a crescent moon.
  2. No more having to rip everything out and start over if you miscounted your beginning chain row like in the past.
  3. The foundation row can be used to determine the length/gauge of a row when it's not set because the stitches are true-to-size unlike a chain, which is impossible to use as a row-length gauge.
  4. And best of all, because the top and bottom look identical, stitches can be attached to both sides.
How to make the foundation single crochet row

For your first stitch

Step 1: Chain two
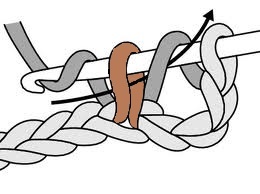
Step 2: Insert hook under top two strands of first chain (nearest the knot)
Step 3: Yarn over, pull through the two strands of the first chain (link)
Step 4: Yarn over, pull through forming one loop (chain part completed- this is the next stitch you will be inserting your hook under to create the second single crochet stitch - instructions below)
Step 5: Yarn over, pull through two loops (single crochet part completed)

For the second stitch (including all subsequent stitches)

Step 1: Insert hook in chain part of previous stitch under left and back strands of chain part
Step 2: Yarn over, pull through the two strands of the previous chain (link)
Step 3: Yarn over, pull through forming one loop (chain part completed)
Step 4: Yarn over, pull through two loops (single crochet part completed)

Repeat the second stitch until you have the required chainless beginning in your pattern.

My camera decided it was done cooperating so instead of a photo tutorial, here is a Youtube video from Crochet Geek. She demonstrates how to do this stitch extremely well.
Enjoy!


And for my left-handed crocheters, here is the same but left-handed.


Tuesday, June 26, 2012

Angel's Crochet & Knit time - The Golden Loop and its effects on your gauge

Print Friendly and PDF
Last week I talked about tightening up purl stitches and posted a lovely Youtube video by Cat Bordhi on how to do that.


This week, I'm going to talk about something near and dear to my heart and that is How many turning chains to make when you are using double crochet and how the Golden Loop affects your gauge.

The answer is quite simple. It depends on how tall your double crochet stitch is. 

Tall Golden Loop dc
If the first loop you pull through the stitch is very long, then you will have a tall double crochet stitch which will mean you will need to chain 3 to turn. 

Short Golden Loop dc
But if your first loop is very short and tight, that will make a short double crochet stitch which will only require a chain 2 to turn. Doing this will keep your edges nice and even with no bumps from a too long turning chain.

Most patterns say to chain 3 to turn, that seems to be the standard. But just because a pattern says to chain 3, it doesn't mean you HAVE to chain 3 to turn! There is no written rule that says you have to follow a pattern to the letter or in this case the number. Check how you make your double crochet and it will tell you how many you need to chain to turn.

The other thing that this Golden Loop affects is your gauge!
When you make a gauge swatch and you find that you are not meeting row gauge, chances are your first loop is either too tight or too loose. If your row gauge is too short, when you pull your first loop through for each stitch, pull up a bit more on it and it will make your stitch higher. If your row gauge is too high, don't pull up quite as much on your golden loop and you should hit row gauge.

While researching this post, I came across a Crochetville forum post in which Jean Leinhauser described her Golden Loop method for the double crochet stitch:
"YO, insert hook in specified stitch and draw up a loop -- NOW STOP! This is the Golden Loop, and it determines the ultimate height of your stitch. If you need a taller stitch, draw this loop up higher. If your stitch is too tall, don't draw this loop up so high.Now just finish the dc as usual. You may need to practice a few rows with the new height to get it to become automatic. It is this one loop, not the size of the hook, that determines row gauge."
What I'd been doing for a long time was simply doing a chain 2 instead of the requested chain 3. Since I found this gem, I have used it to adjust the row gauge and it works like a charm!

I've also tried other ways of taking in the turning chain when it had a bad habit of sticking out. One of those ways was to insert the hook in the 2nd chain from the hook, draw a loop through (this replaced the usual yarn over) and then insert my hook into the next stitch, yo, pull yarn through the stitch and the first loop on my hook, yo again and draw through both loops the same as a regular dc. This would make my chain 3 stick to the next  stitch like glue. In some instances, this is a really good fix for example blankets, dishcloths, anything that has an edge that will not be finished. 

I hope this helps solve some of the row gauge issues that many crocheters have. Good luck and let me know how it works out for you.


Tuesday, June 19, 2012

Tuesday... must be Angel's Crochet and Knit Time!

Print Friendly and PDF
And here I go with my first ever Angel's Crochet & Knit time.

Each week I will cover something different. It may be related to technique, a stitch pattern, a problem, a specific pattern and it will be either crochet or knitting.

So what will I talk about today?

I think I'll cover something related to knitting....most of us can knit beautifully with nice even stitches, but quite a few have issues when it comes to purling. The stitches end up being sloppy, loose, and make the knit side look off balanced. I had that problem as well until I came across this youtube video by Cat Bordhi.


She talks about sock knitting, but this technique can be used for ribbing and cables as well. Give it a try and see how it works for you.

Since I've been on a sock knitting bend for the past month, I can't get socks out of my head! But I've finally finished the last pair today! and I'll be writing up the pattern to publish soon.